DIY Shed Plans with Detailed Instructions: Build with Confidence
Tired of cluttered garages and overflowing storage spaces? Dreaming of a neat, organized outdoor haven for your tools, garden supplies, or even a cozy workshop? Building your own shed is a rewarding project that can transform your property and boost your DIY skills. This comprehensive guide provides detailed plans and instructions, empowering you to build with confidence, even if you're a beginner.

Planning Your Shed: Laying the Foundation for Success
Before you even touch a tool, meticulous planning is paramount. This phase sets the stage for a smooth and successful build. Start by defining your needs. What size shed do you require? Consider the items you'll store and allow ample space for maneuvering. What style are you aiming for? A simple gable roof is easier for beginners, while a more complex design offers unique aesthetic appeal. Next, secure the necessary permits from your local authorities – this step is crucial and prevents future headaches. Finally, choose a suitable location on your property, ensuring it's level, accessible, and complies with any zoning regulations.
Essential Considerations for Your Shed Design:
- Size and Dimensions: Carefully measure the space you have available and determine the ideal shed size.
- Material Selection: Choose materials that suit your budget and desired aesthetic – pressure-treated lumber is a popular choice for its durability.
- Foundation Type: Decide on a concrete slab, gravel base, or pier foundation based on your soil conditions and budget.
- Door Placement and Size: Ensure the door location is convenient and allows for easy access to stored items.
- Window Placement: Consider adding windows for natural light and ventilation.
Building Your Shed: A Step-by-Step Guide
With your plans finalized, it's time to get your hands dirty! This phase requires precision and attention to detail. Begin by preparing the foundation according to your chosen method. For a concrete slab, ensure proper leveling and curing time. Next, erect the frame using your pre-cut lumber, meticulously following your detailed plans. Pay close attention to squareness and plumbness at every stage. Once the frame is complete, install the sheathing, ensuring proper alignment and securing all components with the correct fasteners. This provides the base for your exterior cladding.
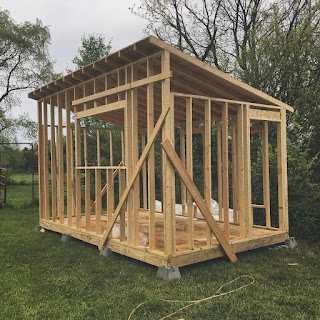
Framing the Shed: Achieving Perfect Squareness:
Accurate framing is the backbone of a strong and stable shed. Use a speed square to ensure all corners are perfectly square (90 degrees). Double-check measurements repeatedly. Use appropriate fasteners – galvanized nails or screws are recommended for their durability and weather resistance. Consider pre-drilling pilot holes in the lumber to prevent splitting.
Installing the Roof: Weather Protection and Aesthetics:
Roof installation requires careful planning and execution. Ensure proper overhang to protect the walls from rain. Use quality roofing materials; asphalt shingles are a cost-effective and widely available option. If you opt for a more complex roof design, consult additional resources or seek assistance from experienced builders. Secure the roofing felt before applying the shingles for a watertight seal.
Finishing Touches: Adding the Finishing Touches
Once the structure is complete, it's time to add the finishing touches that transform your shed from a basic structure into a functional and attractive addition to your property. Install the doors and windows, ensuring they are properly aligned and sealed. Add exterior cladding (siding) for weather protection and aesthetics. Consider adding trim work for a polished look. Apply a protective coat of paint or stain to extend the life of your shed and enhance its curb appeal. Finally, organize your storage space inside, taking full advantage of the new space you've created.
Protecting Your Investment: Choosing the Right Exterior Finish:
Selecting a durable exterior finish is crucial for protecting your investment. Paints and stains offer both aesthetic appeal and weather resistance. Ensure proper preparation of the surface before application – cleaning and priming are essential steps. Choose a high-quality product designed for exterior use.
Conclusion: Enjoy Your New Shed!
Building your own shed is a challenging but deeply satisfying project. By carefully following these detailed plans and instructions, you can create a valuable and attractive addition to your property. Remember to prioritize safety throughout the process, use appropriate personal protective equipment (PPE), and don't hesitate to seek assistance if needed. Enjoy the pride of creating something tangible with your own two hands! Now, go organize your belongings and revel in your newly built outdoor space.